
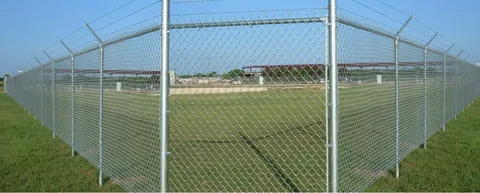
Installing a fence is one of the most effective ways to enhance the security, privacy, and aesthetic appeal of your property. Among the various fencing options available today, PVC coated chain link fences are becoming increasingly popular due to their durability, low maintenance, and sleek appearance. But one question often arises among homeowners and property managers: Can you DIY a PVC coated chain fence install?
The short answer is yes—with the right tools, preparation, and understanding of the process, a DIY installation is entirely feasible. However, before jumping into the installation, it’s essential to evaluate several factors to ensure that the project is suitable for your skills, time availability, and resources.
Note: PVC Coated Chain Fence Installation in Dubai was completed efficiently with superior quality and durability. The project met both residential and commercial safety needs. For long-lasting fencing solutions, trust Aluminium Scaffolding Fence to secure your property—contact us today for a free quote.
Understanding PVC Coated Chain Link Fences
PVC coated chain link fences consist of a standard galvanized steel chain link fence that is coated with polyvinyl chloride (PVC). This coating not only enhances the visual appeal of the fence but also provides extra protection against rust, corrosion, and environmental wear. The result is a longer-lasting fence that maintains its appearance and strength over time.
These fences are ideal for both residential and commercial properties, and they come in various colors, with green and black being the most common. They are particularly useful in areas where both security and aesthetics are important.
Advantages of DIY Installation
Cost Savings
One of the primary reasons homeowners consider DIY installations is the potential for cost savings. By eliminating labor costs, you can significantly reduce the overall expense of the project.
Personal Satisfaction
Installing your own fence can be a rewarding experience. Completing such a project provides a sense of accomplishment and adds a personal touch to your property.
Customization
Doing it yourself allows you to tailor the fence exactly to your preferences and requirements. Whether it’s adjusting the fence’s height, incorporating gates, or following the contours of your landscape, DIY gives you full control.
Challenges to Consider
Physical Demand
Fence installation can be labor-intensive. Digging post holes, mixing concrete, and stretching chain link fabric require physical effort and endurance.
Time Commitment
A DIY fence installation takes time—often more than anticipated. Without experience, the process can be slow, especially for larger areas.
Technical Skills
While not overly complex, the installation does require a degree of technical knowledge and attention to detail. Mistakes in measuring, post setting, or fabric stretching can affect the fence’s appearance and durability.
Tools and Materials You Will Need
Before beginning the installation, gather all necessary tools and materials:
- PVC coated chain link mesh
- Line posts and terminal posts (corner, end, and gate posts)
- Post hole digger or auger
- Concrete mix
- Fence ties and tension wire
- Fence fabric stretcher or come-along
- Level, tape measure, and string line
- Wrenches and pliers
- Gate kit (if applicable)
Ensuring that you have all the necessary equipment will help the project run more smoothly and reduce interruptions.
Step-by-Step Installation Guide
Step 1: Planning and Measuring
Begin by outlining the area where the fence will be installed. Use stakes and string to mark the fence line. Measure accurately and decide the spacing for line posts (typically 6 to 10 feet apart). Also, determine the locations for gates and corners.
Step 2: Mark and Dig Post Holes
Mark the locations for all posts. Use a post hole digger or auger to dig holes approximately 24 to 36 inches deep, depending on your local frost line and fence height. Terminal posts should be set deeper than line posts for stability.
Step 3: Set Posts in Concrete
Place the posts into the holes and fill with concrete. Use a level to ensure they are perfectly vertical. Allow the concrete to cure for at least 24 hours before proceeding.
Step 4: Install Tension Bands and Rails
Attach tension bands and caps to the terminal posts. Connect top rails to the line posts and terminal posts, securing them with rail ends and brace bands. This framework provides structural support for the chain link fabric.
Step 5: Attach and Stretch Fence Fabric
Unroll the PVC coated chain link mesh along the fence line. Start at one terminal post, using a tension bar and bands to secure it. Use a come-along or fence stretcher to pull the mesh taut toward the opposite terminal post. Attach the fabric securely, ensuring there are no sags or gaps.
Step 6: Secure Fabric and Add Tension Wire
Fasten the chain link fabric to the line posts using fence ties or wire. Install a tension wire along the bottom to prevent the fabric from being pushed up or bent. Double-check the alignment and tension throughout the entire fence.
Step 7: Install Gates and Final Touches
If your fence includes gates, install them using the appropriate hinges and latch hardware. Make any necessary adjustments to ensure smooth operation. Finish by walking the perimeter and ensuring all ties, tension, and components are secure.
Safety Considerations
Wear Protective Gear
Always wear gloves, safety glasses, and appropriate footwear when handling tools and fencing materials. This will help prevent injuries from sharp edges and heavy equipment.
Check for Underground Utilities
Before digging, contact your local utility companies or use a locating service to ensure there are no underground lines where you plan to install posts.
Follow Local Regulations
Check local building codes and HOA regulations before starting the project. Permits may be required, and there could be height or boundary restrictions.
When to Consider Professional Help
While a DIY PVC coated chain link fence installation is possible, there are situations where hiring a professional may be the better option:
- Large property size requiring extensive fencing
- Complex terrain with slopes or uneven ground
- Time constraints that limit your availability
- Lack of tools or experience with construction work
A professional installer can complete the job quickly and ensure long-lasting, high-quality results. However, for many homeowners with moderate DIY experience, a small to medium-sized fence is a manageable project.
Maintenance Tips Post-Installation
Once your fence is installed, regular maintenance can keep it looking great and functioning well:
- Inspect regularly for loose ties or rust spots (though rare with PVC coating)
- Clean with water to remove dirt, mold, or debris
- Lubricate gate hinges to ensure smooth operation
- Trim vegetation near the fence to prevent interference
By following these steps, your fence can remain a durable and attractive feature for years.
Conclusion
So, can you DIY a PVC coated chain fence install? Absolutely. With careful planning, the right tools, and some elbow grease, a do-it-yourself installation is entirely within reach. While challenges exist, the satisfaction and savings that come from a successful project are often well worth the effort. Just be sure to assess your abilities, follow safety guidelines, and consider professional help when needed. Whether for added security, boundary marking, or visual appeal, a well-installed PVC coated chain link fence is a valuable investment for any property.
For more insightful articles related to this topic, feel free to visit techners.net


Leave a Reply