XTEN-AV understands that achieving the perfect projector setup can be surprisingly tricky, even when your equipment appears to be correctly installed. One of the most common complaints among home theater enthusiasts and AV integrators is a tilted or skewed projector image despite using a mount that is level and secure. You might find yourself asking, “Why is my projector image tilted even though the mount is straight?” This issue can be frustrating, especially after spending time aligning and mounting your projector carefully.
A tilted projector image not only affects the viewing experience but can also cause strain on your eyes and interfere with the clarity of the content. In this blog, we will explore the main reasons behind this problem, why it happens, and most importantly, how to fix it effectively. We will also touch on some related issues, including projector blurry images and other common projection problems, because understanding one problem often leads to a solution for another.
Understanding Projector Image Tilt
Even when a mount appears perfectly straight, the image projected onto your screen can still look tilted or trapezoidal. This is typically caused by a misalignment between the projector lens, the mount, and the screen. While it may seem counterintuitive, a projector can be mounted straight and still project a skewed image due to small errors in placement, lens angle, or screen surface.
There are several factors that contribute to image tilt. Some of the most common include improper keystone adjustment, uneven screen surfaces, lens shift misalignment, and even optical imperfections in the projector itself. Recognizing the root cause is the first step toward solving the problem.
Keystone Correction Issues
One of the most frequent reasons a projector image looks tilted is keystone correction. Keystone correction is a feature in almost all modern projectors that allows you to adjust the image digitally or mechanically to compensate for angled placement.
If the projector is mounted perfectly straight but the keystone correction is improperly set, your image may appear tilted or distorted. Many users unintentionally leave keystone correction enabled when it is not necessary, which can slightly skew the image. This can also be linked to situations where your projector is blurry. Some users ask, “Why is my projector blurry?” only to find that incorrect keystone adjustments are partially responsible for both blur and tilt.
To fix this issue, check your projector settings. Disable keystone correction temporarily and see if the image aligns properly. Then, adjust the keystone manually while keeping the projector centered to the screen. Proper keystone adjustment ensures that your image is rectangular, aligned, and sharp.
Lens Shift Misalignment
Another critical factor is lens shift. Many projectors come with a lens shift feature that allows vertical and horizontal adjustments without physically moving the projector. If the lens shift is misaligned, even a straight mount can produce a tilted image.
Lens shift is particularly important in ceiling-mounted projectors or setups where the projector cannot be centered directly in front of the screen. Incorrect lens shift can also contribute to minor blur issues. If you notice that your projector is blurry in certain areas while the image is tilted, lens misalignment could be the culprit. Adjust the lens shift carefully according to the projector’s manual. Small movements can dramatically improve both alignment and clarity.
Screen Surface and Placement
Even if your mount is perfectly level, the screen itself could be a source of the tilt. Uneven walls, slightly warped screens, or tensioned screens that are not fully flat can create the perception of a tilted image.
Many users do not realize that a tensioned screen must be completely flat to avoid projection distortions. A sagging or curved screen edge can make your perfectly straight projector mount appear as though it is projecting at an angle. This is another scenario where the image might be both tilted and blurry, and people ask, “Why is my projector blurry?”
The solution here is to ensure your screen is installed on a completely flat surface, with tension evenly distributed across the frame. Use a level to confirm the screen’s alignment independently from the projector mount.
Mounting Hardware and Installation
Sometimes, the issue is as simple as the mount itself. Even when it looks straight visually, the screws and brackets may have slight tolerances or flex that cause a small tilt. Over time, mounts can loosen or shift, causing the image to appear angled.
High-quality mounts are essential for a stable installation. If you are experiencing a tilted image, double-check all screws, joints, and bracket angles. Tighten any loose connections and confirm the mount is rigid. Avoid cheap or flexible mounts, as they can cause small tilts that are amplified on the screen.
Projector Orientation and Placement
The position of the projector relative to the screen is another critical factor. Projectors should ideally be centered horizontally and placed at the proper distance from the screen to avoid tilt. Even slight horizontal misalignment can make a straight mount look off-angle.
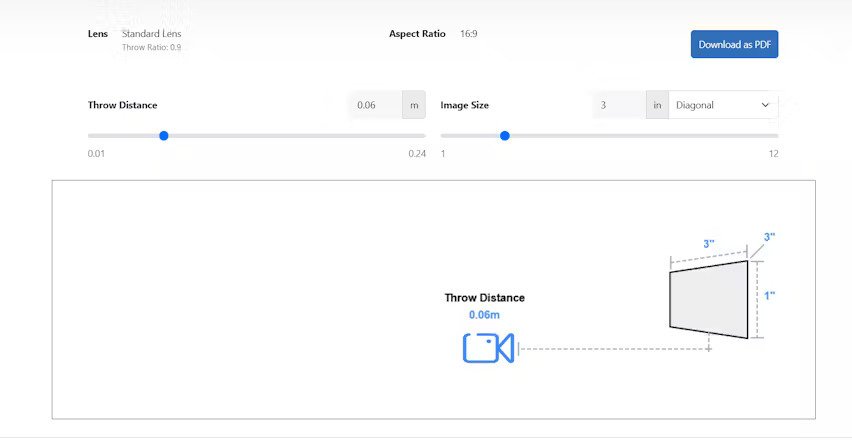
The vertical height of the projector also matters. Placing the projector too high or too low can necessitate keystone corrections that induce minor tilt. Always refer to the projector’s throw distance chart to find the optimal height and distance. Proper placement minimizes the need for excessive digital corrections that could blur the image. techners
Environmental Factors
Environmental conditions can also play a subtle role in image tilt. Vibrations from nearby appliances, HVAC systems, or heavy foot traffic can cause a mounted projector to shift slightly over time. Temperature fluctuations can expand or contract mounting brackets or walls, creating minute angles that tilt the image.
Regular maintenance checks can prevent these small issues from becoming significant problems. Ensure your mount remains secure and periodically check the alignment with a level or laser guide.
Troubleshooting Tilted Projector Images
If your projector image is tilted even though the mount is straight, XTEN-AV recommends a systematic approach:
- Check Mount Level: Use a bubble level or laser level to confirm the mount is truly horizontal. Even small deviations can affect image alignment.
- Inspect the Screen: Ensure the screen is flat and properly tensioned. Uneven edges or warping can make the image appear tilted.
- Adjust Keystone: Disable automatic keystone and manually correct the image. Observe the effect and fine-tune until the image is perfectly rectangular.
- Verify Lens Shift: Adjust vertical and horizontal lens shift to align the image without stretching or distorting it.
- Check Projector Position: Confirm the projector is centered and at the proper throw distance. Avoid extreme angles that require heavy correction.
- Secure Mount Hardware: Tighten all screws and joints. Replace cheap mounts with high-quality, rigid brackets if necessary.
- Observe Environmental Effects: Ensure vibrations or temperature changes are not affecting alignment.
Following these steps typically resolves the problem of a tilted projector image while improving overall image clarity. You may also find that addressing tilt helps reduce blur, answering the common question, “Why is my projector blurry?”
How Tilt Can Affect Image Clarity
A tilted projector image is not just a cosmetic issue. It can impact clarity and sharpness, particularly at the edges. When the image is angled, the focus may not be uniform across the screen. Some areas may appear crisp while others are blurry, causing the projector to look inconsistent in performance.
Users often ask, “How to fix blurry projector issues?” and the answer can sometimes be linked to correcting tilt. Aligning the projector image properly ensures that focus and resolution are consistent across the entire screen, improving the viewing experience.
Final Thoughts
Even with a straight mount, several factors can cause your projector image to tilt, including keystone correction, lens shift, screen tension, mount hardware, placement, and environmental conditions. XTEN-AV emphasizes the importance of a holistic approach to projector setup. By systematically checking each component and making precise adjustments, you can achieve a perfectly aligned, sharp, and clear projection.
Remember, small deviations in mount level or screen placement can create noticeable tilt on the projected image. Regular checks, high-quality mounts, correct keystone settings, and careful lens adjustments are key to preventing both tilt and blur. The next time you ask, “Why is my projector blurry?” consider that the problem might be related to image tilt and alignment. Fixing tilt not only improves image geometry but can also enhance clarity, making your home theater or presentation setup truly enjoyable.
In conclusion, a tilted projector image is rarely caused by a single factor. It is the interplay of mount stability, projector settings, screen quality, and environmental influences. Following the tips outlined above will help you correct tilt, improve focus, and get the most out of your projector. With attention to detail and proper setup, your projector can deliver a crisp, level, and immersive viewing experience every time.
Read more: https://sites.google.com/view/avsolutionhub/blog/how-to-auto-correct-focus-drift-in-long-sessions


Leave a Reply