Setting up a home theater can transform the way you watch movies, enjoy shows, or play games, but one wrong step in projector placement can ruin the entire experience. Even with a high quality projector, improper positioning can lead to dim images, distorted visuals, or uncomfortable viewing angles. A proper Home Theater Projector Placement Guide is essential to ensure that your projector delivers sharp, bright, and immersive visuals. In this blog you will learn the most common projector placement mistakes and how to avoid them for a flawless home theater setup.
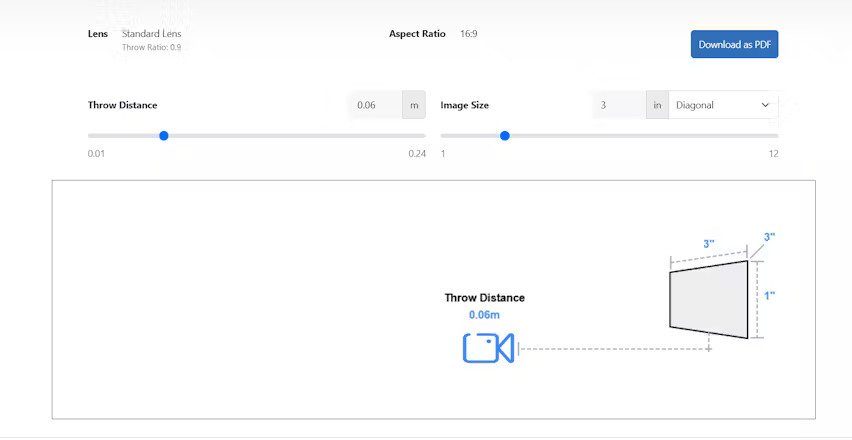
Incorrect Throw Distance
One of the biggest mistakes in projector placement is ignoring the throw distance. Throw distance is the space between the projector lens and the screen. Every projector has a required distance to produce the right image size. If the projector is too close, the image becomes small. If it is too far, the image becomes blurry or oversized. Always check your projector’s specifications and use a Home Theater Projector Placement Guide to measure the correct distance before installation.
Placing the Projector Too High or Too Low
Projectors are designed to work at specific angles. If you install yours too high or too low, it causes keystone distortion, making the image appear trapezoidal instead of rectangular. Although many projectors have digital keystone correction, relying on it reduces image quality. Ideally, place the projector at the center of the screen height or slightly above depending on the projector type to achieve a perfect rectangular image.
Ignoring Room Lighting Conditions
Light affects projector performance more than most people realize. Placing a projector in a room with excessive natural or artificial light leads to washed out images. Avoid placing your screen opposite windows and use blackout curtains whenever possible. A good Home Theater Projector Placement Guide always emphasizes controlling ambient light to improve brightness and contrast.
Choosing the Wrong Screen Size
Many homeowners make the mistake of choosing a screen size that does not match the projector’s capabilities or the room dimensions. If the screen is too large for the throw distance, the projector may struggle to produce a bright and clear image. If it is too small, you will not get the cinematic experience you expect. Carefully match the screen size with your projector model and room layout.
Improper Ventilation Around the Projector
Projectors generate heat and require proper airflow to function efficiently. Placing your projector inside a closed cabinet or too close to a wall can cause overheating, reduced lifespan, and performance issues. Always leave enough ventilation space around the projector and avoid blocking air vents. Good airflow ensures consistent performance during long movie sessions.
Not Accounting for Lens Shift and Zoom Features
Some projectors offer lens shift and zoom, while others do not. If you assume your projector has these features when it does not, it can restrict placement options. Lens shift allows horizontal and vertical adjustment without moving the projector physically. Zoom helps adjust the image size by altering lens magnification. Always check your projector capabilities before mounting it to avoid placement challenges.
Mounting the Projector Before Testing the Image
A common mistake is mounting the projector permanently before testing angles, brightness, and image alignment. This often results in having to unmount and reposition the device multiple times. Instead, run a few tests using a temporary stand or table. Adjust distance, height, angle, and focus until everything looks perfect. Only then should you mount the projector securely. techners
Incorrect Wiring and Cable Management
Poor cable management not only looks messy but can also cause safety hazards and signal interference. Running cables across the room or leaving them exposed creates clutter. Use cable conduits, ceiling cable tracks, or in-wall wiring solutions for a clean setup. A proper Home Theater Projector Placement Guide reminds homeowners that neat wiring enhances both function and aesthetics.
Using the Wrong Type of Mount
Projectors require stable and compatible mounts to ensure proper alignment. Using generic mounts or low quality hardware can cause instability and vibration, resulting in image shake or misalignment. Make sure to choose a mount designed for your projector model and follow the installation instructions carefully.
Overlooking Sound System Placement
Your projector placement should also consider speaker location. Placing the projector too close to your audio equipment can create noise interference, while placing it in front of speakers may block sound. Align your projector and sound system in a way that both visuals and audio work harmoniously together.
Forgetting About Seating Distance
Seating distance determines how immersive the movie experience feels. If your seats are too close to the screen, the image appears pixelated or overwhelming. If they are too far, you lose visual impact. Follow general guidelines such as sitting at a distance 1.5 to 2.5 times the screen diagonal. This ensures comfortable and cinematic viewing.
Not Using a Home Theater Projector Placement Guide
Many placement issues arise simply because people skip the planning stage. A Home Theater Projector Placement Guide provides essential instructions on screen height, projector offset, throw distance, lighting control, and installation techniques. Skipping this step can lead to avoidable misalignments and performance problems.
Conclusion
Setting up a home theater requires careful planning, especially when placing your projector. By avoiding common mistakes such as improper throw distance, poor lighting control, incorrect mounting, and lack of ventilation, you ensure the best possible viewing experience. A reliable Home Theater Projector Placement Guide can help you position everything accurately for bright, clear, and immersive visuals. With the right setup your home theater will deliver a truly cinematic experience every time.


Leave a Reply