Installing Ceiling Speakers can transform your home or commercial space, providing high-quality audio while keeping your walls free from bulky sound equipment. Traditionally, installation involves running wires through an attic or wall cavity, but what if you do not have attic access? Fortunately, with the right planning, tools, and techniques, you can successfully install ceiling speakers without an attic. XTEN-AV, a leader in AV system design, provides tools and guidance to plan speaker placement and wiring, ensuring a Perfect Audio Layout. In this blog, we will walk you through a step-by-step method to install ceiling speakers without attic access.
1. Planning Your Speaker Layout
Before installation, proper planning is essential:
- Identify Listening Zones: Determine the primary areas where sound coverage is needed.
- Select Speaker Locations: Consider symmetry and distance from walls to avoid echo or uneven audio.
- Check Ceiling Type: Identify if your ceiling is drywall, plaster, or drop ceiling, as this affects installation methods.
- Measure and Mark: Use a tape measure and pencil to mark the exact spots where the speakers will be mounted.
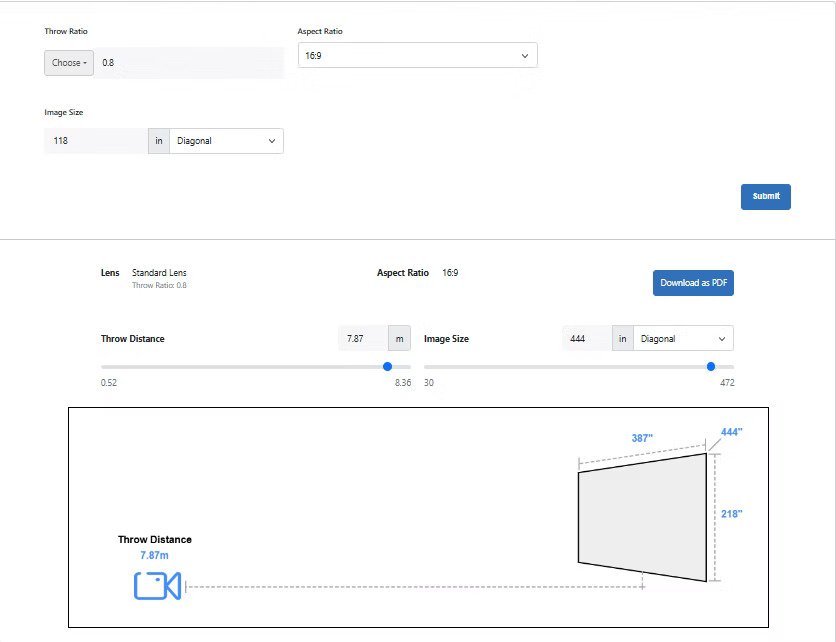
XTEN-AV’s planning tools allow you to simulate speaker placement and coverage, helping to visualize the sound distribution without physically testing each location.
2. Choose the Right Ceiling Speakers
Selecting the right Ceiling Speakers is critical:
- Size: Smaller speakers work well for rooms with lower ceilings, while larger models provide better bass and coverage.
- Power Handling: Match the speaker wattage to your amplifier or AV receiver.
- Impedance: Ensure compatibility with your existing system, typically 8 ohms or 4 ohms.
- Mounting Type: Look for models that are easy to mount without attic access, often called “retrofit” speakers.
Correct speaker selection ensures excellent sound quality and a smooth installation process.
3. Plan the Wiring Route
Without attic access, you need an alternative path for wiring:
- Use Surface-Mount Raceways: These are channels that attach to the ceiling or wall, hiding wires while maintaining a clean appearance.
- Run Through Walls: If possible, use a fish tape to pull wires through the wall cavity from an accessible point.
- Drop Ceiling Access: For commercial spaces with drop ceilings, cables can be run above ceiling tiles without needing attic access.
XTEN-AV allows you to plan wiring routes in 3D, ensuring minimal interference and optimal signal delivery.
4. Cut the Ceiling Holes
Once the speaker locations are marked:
- Use a drywall saw or hole cutter matched to the speaker’s mounting bracket.
- Ensure the hole is centered and smooth for secure speaker attachment.
- Check that there are no hidden electrical wires, plumbing, or structural beams in the cutting area.
Accuracy at this stage is important for a flush and professional installation.
5. Pull the Speaker Wires
Without attic access, pulling wires requires careful planning:
- Use a Fish Tape or Wire Puller: Feed the wire through walls or conduits to the ceiling hole.
- Consider Pre-Wiring: If the ceiling is accessible from above via a removable panel or drop ceiling, pre-run the wires before mounting.
- Secure Wires Along the Route: Use cable clips or adhesive mounts to prevent sagging or loose wires.
XTEN-AV can simulate wire runs, helping you plan the most efficient and hidden path for speaker cables.
6. Install the Mounting Brackets
Most retrofit ceiling speakers include mounting brackets that hold the speaker in place:
- Insert the bracket into the ceiling hole.
- Use the provided screws or clamps to secure it tightly to the drywall.
- Ensure the bracket is level and stable before proceeding to wire connection.
A secure bracket prevents rattling and ensures the speaker remains in place for years.
7. Connect the Speakers
Next, connect your Ceiling Speakers to the wire:
- Strip about half an inch of insulation from each wire.
- Connect the positive and negative terminals on the speaker to the corresponding wires.
- Use wire nuts or spring clips for a secure connection.
- Double-check polarity to maintain proper stereo imaging and sound quality.
Proper wiring ensures your speakers perform optimally without hums or phase issues.
8. Insert and Secure the Speakers
After wiring:
- Gently insert the speaker into the mounting bracket.
- Tighten the mounting clamps or screws as per the manufacturer’s instructions.
- Check that the speaker sits flush with the ceiling for a clean, professional appearance.
This step completes the physical installation of the speaker.
9. Test Your System
Before finishing up, testing is critical:
- Turn on your AV system and play audio through the newly installed ceiling speakers.
- Listen for even coverage, clarity, and bass response.
- Adjust amplifier settings or equalizer to optimize sound quality.
XTEN-AV planning tools can predict acoustic coverage, helping identify potential dead spots before physical testing.
10. Finishing Touches
Finally, ensure your installation is visually appealing and safe:
- Tuck wires into raceways or behind ceiling panels.
- Paint or touch up the ceiling around the speakers if needed.
- Label wires for easier maintenance or future upgrades.
A clean installation ensures both aesthetic appeal and long-term functionality. techners
Conclusion
Installing ceiling speakers without attic access may seem challenging, but with careful planning, the right tools, and proper techniques, it is entirely achievable. Accurate planning of speaker placement, wiring routes, and mounting ensures optimal sound quality and a professional finish. XTEN-AV’s AV design tools simplify this process by simulating speaker layouts, wiring paths, and audio coverage, helping achieve a Perfect Audio Layout before installation.
By following these step-by-step guidelines, you can enjoy high-quality ceiling-mounted audio in any space without needing attic access, combining both practicality and premium sound performance.


Leave a Reply