Setting up a projector correctly is essential for achieving sharp, well-aligned, and properly sized images on the screen. One of the most critical aspects of this process is calculating the throw distance, which determines how far the projector should be placed from the screen. Manual calculations can be time-consuming and prone to error, especially for complex installations with different projector types, screen sizes, or room layouts. This is where automatic projector throw calculators come in. These tools simplify the process, providing instant and accurate calculations. In this blog, we will explore how automatic projector throw calculators work, the technology behind them, and why tools like XTEN-AV are invaluable for professionals and enthusiasts alike.
Understanding Throw Distance
Before understanding how automatic calculators work, it is important to revisit the basics. Throw distance is the distance between the projector lens and the screen. It determines the image size and is closely tied to the projector’s throw ratio.
The formula is simple:
Throw Distance = Throw Ratio × Image Width
For example, if a projector has a throw ratio of 1.5:1 and the screen width is 100 inches, then the projector should be placed 150 inches (12.5 feet) away from the screen.
While this is easy for simple setups, real-world situations often involve multiple variables, such as zoom lenses, aspect ratios, unusual screen dimensions, or room limitations. This is where automatic calculators become very useful.
What Is an Automatic Projector Throw Calculator
An automatic projector throw calculator is a digital tool that uses built-in algorithms and projector data to calculate the ideal placement distance based on user inputs. Instead of manually applying formulas, users simply enter details such as screen size, aspect ratio, and projector model, and the tool instantly provides recommended minimum and maximum throw distances.
Advanced calculators, like those integrated into XTEN-AV, also consider other factors such as lens shift, zoom capabilities, ceiling height, and ambient light conditions to provide more accurate and practical recommendations.
How Automatic Projector Throw Calculators Work
Automatic calculators use a combination of projector specifications, geometric formulas, and sometimes visual simulation to produce accurate results. Here’s a step-by-step look at how they typically work.
1. Input Stage
The first step is collecting essential information from the user. This usually includes:
- Screen size (diagonal measurement)
- Aspect ratio (most commonly 16:9 or 21:9)
- Projector model or throw ratio
- Desired installation type (ceiling mount, table mount, rear projection)
- Room dimensions (length, width, height)
For professional setups, additional information may include lens type, curvature of the screen, or special projection techniques like edge blending.
2. Data Retrieval
Once the user inputs basic information, the calculator retrieves the relevant technical specifications from its database. For example, if a specific projector model is selected, the tool automatically fetches the throw ratio range, zoom lens details, and lens shift capabilities.
Professional tools like XTEN-AV maintain extensive and regularly updated libraries of projector specifications, ensuring accuracy.
3. Geometric Calculations
The calculator applies geometric formulas to determine the ideal throw distance. This involves:
- Converting the diagonal screen size into width and height using the aspect ratio.
- Multiplying the width by the throw ratio to find the minimum and maximum placement distances.
- Adjusting calculations for short throw, ultra short throw, or long throw lenses.
- Factoring in zoom lens ranges to provide flexible placement options.
For example, a 120-inch 16:9 screen has a width of about 104.6 inches. With a projector that has a throw ratio of 1.3 to 1.6, the calculator will output:
- Minimum distance: 1.3 × 104.6 = 135.98 inches
- Maximum distance: 1.6 × 104.6 = 167.36 inches
This gives users a clear placement range.
4. Lens Shift and Mounting Adjustments
More advanced calculators also consider lens shift. Lens shift allows the image to be moved vertically or horizontally without physically moving the projector. The tool calculates how much adjustment is available and ensures the projector can be mounted in a practical position.
For ceiling mounts, the calculator may factor in ceiling height and projector offset to recommend an exact mounting point.
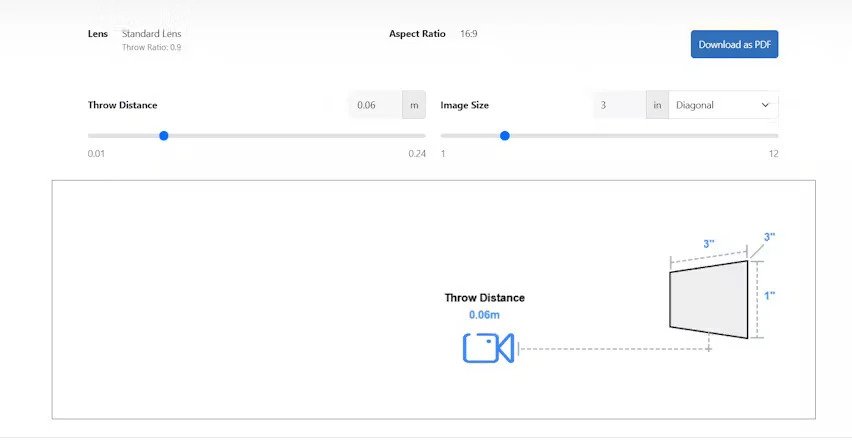
5. Output and Visualization
The final step is providing results in a clear format. Most automatic throw calculators present:
- Minimum and maximum throw distances
- Recommended placement position
- Warnings if the selected projector is unsuitable for the desired screen size
- Visual diagrams or room layouts showing projector placement relative to the screen
Tools like XTEN-AV take this further by generating full projection layouts, including seating positions, speaker placements, and cable routing, making the design process comprehensive and precise.
Benefits of Using Automatic Throw Calculators
Automatic throw calculators offer several advantages over manual calculations.
1. Speed and Accuracy
They instantly provide precise results, saving time and reducing human error.
2. Handling Complex Setups
They can process multiple variables like lens shift, zoom, and room dimensions, which are difficult to calculate manually.
3. Flexibility
They allow users to experiment with different screen sizes, projector models, or mounting positions without recalculating everything manually.
4. Professional Results
They provide installation-grade accuracy, which is essential for AV professionals working on commercial projects, auditoriums, or home theaters.
5. Visualization
Many tools offer graphical representations, making it easier to understand placement and alignment.
Why XTEN-AV Stands Out
XTEN-AV integrates automatic throw distance calculation into a complete AV design platform. It allows users to:
- Select from a wide range of projector models with built-in specifications
- Input room and screen details with ease
- Instantly calculate throw distances with precision
- Generate detailed 2D and 3D layout drawings for installation
- Adjust for real-world conditions like ceiling height, lens shift, and ambient light
This makes it ideal for both professionals and enthusiasts who want reliable results without spending hours on manual calculations.
Practical Tips When Using Automatic Calculators
- Always Double Check Model Details: Ensure the correct projector model is selected to get accurate throw ratios.
- Consider Real Room Conditions: Factor in obstacles, ceiling fixtures, and light sources that might affect placement.
- Use Visualization Tools: Look at the layout diagrams to avoid installation surprises.
- Adjust for Future Upgrades: Leave some flexibility in placement for future projector replacements or screen size changes.
- Test Before Permanent Mounting: Even with accurate calculations, it’s wise to test the projector placement before drilling mounts.
Conclusion
Automatic projector throw calculators have transformed the way projection setups are planned and executed. By combining projector specifications, user inputs, and geometric formulas, these tools provide fast, accurate, and professional-grade results.
Using a platform like XTEN-AV makes the process even more powerful. It not only calculates throw distances but also integrates these calculations into complete AV design workflows, ensuring every aspect of the setup is precise and efficient.
Whether you are setting up a home theater, a classroom, or a large commercial installation, automatic throw calculators eliminate guesswork and streamline the process, allowing you to focus on delivering the best visual experience possible.
Read more: https://paidforarticles.in/whats-the-ideal-throw-for-a-100-inch-4k-screen-881098


Leave a Reply