In 2025, projectors are a staple in classrooms, corporate offices, home theaters, and event venues. They provide immersive visuals and high definition image quality, but achieving the perfect image requires accurate placement. Normally, measuring the distance from the projector to the screen involves tools like tape measures or laser distance meters. However, there are situations where these tools may not be available. Knowing how to measure projection distance accurately without tools can be a valuable skill for AV professionals and enthusiasts alike.
In this blog, we will explore different methods for estimating projection distance, factors to consider, and how XTEN-AV can complement these techniques to ensure precise projector placement.
Understanding projection distance
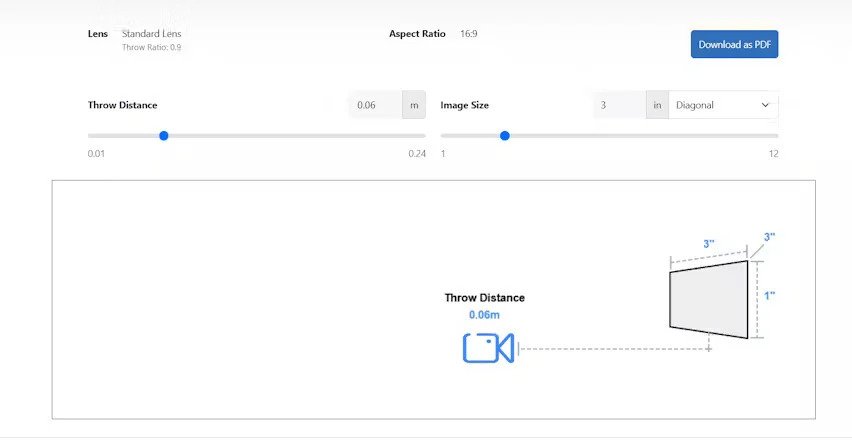
Projection distance, also known as throw distance, is the measurement from the projector lens to the screen. It is a crucial factor in determining image size, clarity, and brightness. Throw distance works in conjunction with the projector’s throw ratio, which is usually provided by the manufacturer.
The formula to determine throw distance is:
Throw Distance = Throw Ratio × Image Width
For example, if a projector has a throw ratio of 1.5 and the desired image width is 8 feet, the projector should be approximately 12 feet away from the screen.
Even without precise measuring tools, understanding throw distance allows you to estimate the projector placement accurately, especially for short throw or ultra short throw projectors.
Why accurate projection distance matters
Correct projection distance impacts several aspects of the viewing experience:
- Image clarity: Proper distance ensures the image remains in focus.
- Correct size: Prevents the image from being too small or too large for the screen.
- Brightness uniformity: Proper placement ensures even illumination across the screen.
- Professional setup: Important for classrooms, offices, and event venues where image quality affects presentations.
- Home theater optimization: Achieves a cinematic experience with optimal screen coverage.
Misjudging projection distance can lead to blurry, distorted, or improperly sized images, reducing the overall visual quality.
Methods to measure projection distance without tools
Even without measuring devices, you can estimate projection distance using practical and creative techniques. Here are some effective methods:
1. Use body measurements
You can use your own body as a reference for measurement. Average human steps are approximately 2.5 feet per step. Measure the distance from the projector to the screen by counting your steps.
Example:
If the projector is 5 steps away from the screen, the throw distance is roughly 12.5 feet. Adjust based on your stride length.
2. Use reference objects
Furniture or other fixed objects in the room can serve as reference points. For example, if a desk is 3 feet long, use it to estimate multiples to reach the desired distance. Combine multiple objects to approximate the total throw distance.
3. Use floor tiles
Floor tiles can help in estimating distance. Measure how many tiles lie between the projector and the screen and multiply by the width of one tile. This method is effective for classrooms or offices with standard tile sizes.
4. Use screen width proportion
If you know the desired image width, you can use visual estimation to position the projector. For example, imagine the image width in relation to a wall or screen and step back until the projected image fits the intended size.
This method works well for small home theaters or temporary setups, although it may not be as precise for large venues.
5. Use shadows
Project an image or beam light from the projector and observe the shadow cast by a person or object. Adjust the distance until the projected image aligns with the intended screen size. Shadows can help in fine tuning placement when no measuring tools are available.
Tips for improving accuracy without tools
- Double check with multiple methods: Combine steps, reference objects, and visual estimation to improve accuracy.
- Mark approximate spots: Use tape or chalk to mark where the projector will sit. This helps maintain consistency.
- Adjust zoom settings: If your projector has zoom, adjust it to fine tune image size after placement.
- Minimize keystone correction: Place the projector as close to the correct height and distance as possible to avoid image distortion.
- Test with a sample image: Project a test pattern or grid to verify alignment and size.
These practical steps can help achieve reasonable accuracy when professional tools are not available.
How XTEN-AV complements manual estimation
While estimating projection distance without tools is possible, software solutions like XTEN-AV provide a higher level of precision. XTEN-AV offers:
- Projector database: Includes throw ratios and specifications for most major brands.
- Distance and placement simulation: Allows you to visualize projector placement in any room layout.
- Lens shift and zoom adjustments: Helps fine tune placement even if your initial estimate was approximate.
- Real time feedback: See how changes in distance or height affect image size and alignment.
By combining estimation methods with XTEN-AV tools, you can achieve near perfect placement even without measuring devices on hand.
Practical applications
Estimating projection distance without tools is useful in several scenarios:
- Temporary setups: For events or meetings where carrying measuring devices is inconvenient.
- Home theaters: When installing projectors in rooms with limited access to tools.
- Classrooms: Quickly adjust projector placement in multiple rooms without precise measurement tools.
- Event venues: Fine tune projector positions in temporary stages or exhibition setups.
Accurate estimation ensures that even in informal settings, projected images remain clear, correctly sized, and visually appealing.
Final thoughts
Measuring projection distance accurately without tools is possible using practical techniques like body measurements, reference objects, floor tiles, visual estimation, and shadow observation. While these methods can provide reasonably accurate placement, combining them with software like XTEN-AV ensures professional level precision.
XTEN-AV simplifies projector placement by providing a comprehensive database, distance simulations, and lens adjustment features. Even if you start with rough estimates, the software helps refine placement, reduce trial and error, and guarantee optimal image quality.
In 2025, mastering both estimation techniques and modern AV software allows professionals and enthusiasts to achieve flawless projector installation, whether in home theaters, classrooms, offices, or event venues.


Leave a Reply